Pages

Create ~ Inspire ~ Share

Thursday, August 30, 2012

DIY T-shirt Sailor Knot Headband Tutorial

Hi Everyone,
Today is a big day!  I am doing a step by step picture tutorial for you :-)  I have been seeing these super cute t-shirt headbands on Pinterest but there weren't really any tutorials to make one from a t-shirt.  I decided to play around with some old stained jersey cotton shirts of mine and figured it out!! There is no sewing involved!!!


Here is what you need:

An old cotton t-shirt
scissors

That't it!!!


First, you are going to lay your t-shirt out flat


2. Cut the bottom hem off


3.  Now, you are going to cut as many 1/2 inch strips as you want.  The more strips, the thicker the knot will be and will stand out better.  Make sure you cut in even numbers.  For this tutorial I only cut two so I could show you a little easier.  The final picture is actually six strips!


4.  Now, pull the strips tight.  This will make them roll up.


 5.  You are ready to make the sailor knot!  Take one strip and cross it right over left


6.  Take the other strip and lay it right on top in the shape of a U


 7.  Take the right side of the U and put it under the right end of the loop


 8.  Take the left side of the U and place it under the loop


9.  Now, take the right side of the U and put it under the left side of the U and pull it over the top of the loop (it is really hard to explain in words but super easy)


10.  Now you should have two end sticking out the top and two at the bottom.  Pull the top end and the bottom ends away from each other and the knot will form.  You can make it as loose or tight as you want! (Remember that this is a much smaller knot because I only used two strands.


11.  Make sure you stretch out the strands so they are the same length.  Cut a small strand from the sleeve of your t-shirt (about 4 inches long).  Bring the 4 loops together


12.  Now,  you are just going to tie, the small strip around the loops to connect them into a circle.  Make sure you double knot and pull tight!  This pic is before I tied it.


Here is what it looks like tied


Now you just put it on like a normal circular headband.  This next picture is what it looks like with 6 strands!!


Isn't it cute!!

I made a bunch in different colors today.  I am going to use the two strand ones when I go to the gym and save the bigger ones to wear out and about!  The color possibilities are limitless and it's a great way to recycle and old shirt that is just going to get thrown away anyway :-)

Thanks for stopping by today!

~Rebekah

Monday, August 27, 2012

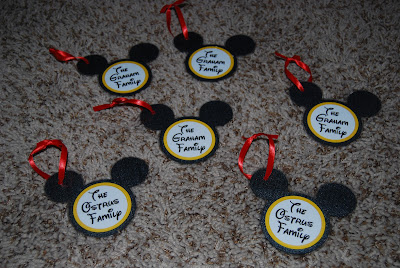
Mickey Mouse Baggage/Stroller tags

Hi Everyone!
I have a sweet friend who lives and breathes Disney and is getting ready to take her 8 month old to Disneyland!  She saw some adorable laminated Mickey Mouse tags on pinterest and asked if I  could make her some :-)

These are 4 1/4"x 3 1/2". I laminated them using my "Your Story" machine.  I wanted to make the most of my laminate page so I made a couple for us ;-)  She is going to tie them to their suitcases and the stroller at the park.  On the back she is going to put a sticker with her phone number on it!  I could have typed the information on the back but they have phone numbers changing soon.


Aren't they perfect or Disneyland?!?!

Have a great day!

~Rebekah

Thursday, August 23, 2012

Print and Cut Organization

Hi Everyone,
One of my favorite features of the Silhouette is the print and cut option!  I have been doing a lot of organizing around the house and decided to make labels for containers in my closet.  I found a shape I liked, typed what I wanted, ran it through the printer and then cut it on my machine.  I even played around with it a little bit more and found out that I could separate the cuts from the silhouette store and change each ones color!!  ( I did that with the underwear picture).

Here is what it looks like before I printed it.  Make sure you have the registration marks on and that your cut lines are for the outside only!


The silhouette cut them out just right!


I used heavy card stock to make sure they were sturdy enough.   Here is what they look like in my closet!


I have a bunch of these bins in the closet and just like to have them all labeled (especially the ones higher up!)  

Have a great day!

~Rebekah

Wednesday, August 22, 2012

Toy Story Heat Transfer

Hi Everyone,
A couple months ago, I made Angry Birds t-shirts for my boys using the ink jet heat transfer paper.  They were a big hit!  I have a nephew who loves Toy Story and he had a birthday last weekend.  I found some digital wallpaper and then used my Silhouette Studio to add his name and the number three.  The font I used is called Gill Sans Ultra Bold.


I like making shirts because they are unique and can't be found in the store.  I know my kids love having their names on them.  I think it turned out pretty cute :-)

Happy Wednesday!

~Rebekah

Monday, August 20, 2012

Fabulous Mini Gift Idea (Sneak Peek)

Hi Everyone,
Today is my day to post over at Pink by Design so I am going to give you just a glimpse of what I did for my project.  You will have to head over to Pink by Design to see the rest ;-)


See you over there!!

~Rebekah

Birthday Cards!

Happy Monday!
We had a couple of birthday parties last weekend and I wanted to share with you the cards I made using the Silhouette machine and Pink by Design Stamps.

The first party was a Shark theme and I found these adorable little guys in the Silhouette Store.  I made the balloons using my 1" circle punch and finished it off with "Take the Cake" sentiments and Pink by Design Twine.


The second party of the weekend was Dora the Explorer.  I found a jpeg on the internet and used the print and cut feature on the silhouette to cut out this cute little Dora.  I again made the balloons with my circle punch, Take the Cake sentiments, and Pink by Design Twine. I embossed the yellow cardstock and had some cute rainbow paper that brightened it up a bit.  The "Take the Cake" set it my go to for Birthdays :-)


Tomorrow is my day to post over at Pink by Design so make sure you come by and say "hi"!

Have a great day!

~Rebekah

Wednesday, August 15, 2012

Lunch Box Treats

Happy Hump Day!!
Hope you are all having a fantastic week!!  As many of you know, my husband is a high school teacher and is already in his second week of school.  I have no idea why schools start in August (especially in Arizona!)  I pack his lunch for him everyday and decided that this year I would add a special treat in, at least once a week.
The "Sweet Grams" sets by Pink by Design are perfect for this!  I snagged a box of Mike & Ike's while I was running errands yesterday and it paired perfectly with this sentiment.


I hand cut a simple heart and added a little note tag.  I don't go overly fancy on these treats because they are going to just get thrown away at lunch time ;-)

Another treat that I put in his lunch last week is one of his favorites.  I picked up a bag of Combos and added a this cute little sentiment.


Aren't these sentiments the cutest?!  Again, it is a really simple tag but he loves opening his lunch to find these fun goodies!

Check back tomorrow for a couple fun Birthday cards!

~Rebekah

Monday, August 13, 2012

A fun Pinterest project!!

Hi Everyone,
Did ya miss me?!  I have been taking a little break from posting but have been working on lots of fun little projects.  I will post them throughout the week :-)

I saw a fun "do it yourself" calendar using the paint chips from Home Depot.  I loved the look of it but decided I didn't want to rob the home improvement stores blind!!


It is so hard to get a decent picture when it is a floating frame :-/  Anyways, here is how I put it all together!

~ 16x20 Floating frame from JoAnn's (on clearance for $5!!)
~ 35  2"x2" pieces of cardstock (whatever colors you like)
~ Etch vinyl
~ 2 other vinyl colors
~ I used my silhouette for the note sections on the right and for the days of the week

I adhered the squares on the back piece of glass using acid free tape runner for my ATG gun.  I cut the Month, Don't forget,  and Live Laugh Love on my silhouette onto my etched vinyl.  The note frames on the right are also from the silhouette store and I cut them on vinyl that I bought at JoAnns.  The days of the week are made using the print and cut feature on the Silhouette and they just happened to match the colors I chose for my calendar.


I placed the top piece of glass over it and put it back in the frame.  The best part is I can write directly on the glass with whiteboard markers and change it from month to month.  I am heading to the store tomorrow for some fun marker colors!  My husband loves the calendar and has already been putting meetings on it so we all know what everyone is doing :-)

I also have to share this delicious pinterest recipe I made for lunch!!


Pizza Grilled Cheese!!

Oh my goodness!! This is absolutely delicious!!  You put some mozzarella cheese and pepperoni in between buttered bread and grill away!!  The best part is, there are lots of different combinations.  I served it up with a little side of pizza sauce and it was so yummy!!!

Enjoy!

~Rebekah