Pages

Create ~ Inspire ~ Share

Saturday, March 31, 2012

Funny Bunny!

Hi everyone!
Sorry I haven't been around much this week!  I have been so busy doing things with my kiddos that I haven't had a chance to be on my computer!  I am going to post some of the fun stuff we did this week on Monday but today I have a funny little card I made for my sister for Easter.

I am sure many of you have seen the little cartoon chocolate bunnies.  I love them and wanted to re-create it in a card!  I found the bunnies on my silhouette store and used my scallop punch to make the bite marks.  The thought bubbles and grass were also in the store!


Makes me laugh everytime I see it ;-)  Check back with me on Monday and see some of the fun stuff I have been up to this past week!!

Have a great weekend,
~Rebekah

Wednesday, March 28, 2012

We have a winner!

Good Morning Everyone!
I picked a winner from the blog hop this weekend using Random.org.  My winner is...

KyleandKatesmom

I don't have an email address for you so please send me an email with your address so I can send you the inkjet transfer paper!!  My email is calbekah@aol.com

I also wanted to share with you the "Thank You" cards I put together for the guests that came to my son's birthday party.  I have been to a lot of birthdays in the past year that haven't given "thank you" cards and I think that is sad.  I know the child doesn't know the difference but I like to let the parents know that I appreciate the fact that they took the time out of their day (usually a weekend day) and spent money on a gift for my child.  Especially when kids are younger and the parents have to stay with them at the party.  "Thank you" cards don't take long to write out and it is just the nice thing to do!!

Ok, that is my little soapbox speech for today :-)

Here they are!


I put these together really quickly with the leftover paper I had from the party!  Just a nice way to say "I appreciate you coming to celebrate my birthday boy!"   

Have a great day!

~Rebekah

Monday, March 26, 2012

Disney Cars Birthday Party!

Happy Monday Everyone!!
First off, I would like to welcome all of my new followers from the blog hop yesterday! Wasn't it fun?!?  I promised yesterday that I would post all of the things I made for my now 3 year old's birthday party this weekend.  It was so much fun and most importantly, he loved it!!

Before I start with all of the pictures I wanted to go ahead and give you the link to the digital scrapbook kit that I bought and was able to use in my silhouette for a lot of my decorations.  The website is called RLR Creations. It was only $5.50 for the entire kit and can be used over and over however you want!

Ok, on to the pics of the party :-)

Invitations
All the details for the invitations are on a previous post! Click here

Sarges Surplus of Sweets
 I wanted to keep all the sweet inside and thought they made the table a lot more colorful!

 The white-wall and black-wall tires came to me as I was trying to sleep.  I thought these little donuts would be perfect.  I just made the tags on my computer and put them on colored cardstock.  Luigi is one of the cuts from the digital kit.  You can make them any size you want and then cut them with the cameo!!


 I found the cupcake stand at Party City and it holds 24!  All of the cupcake toppers are cuts from the digital kit and then I taped them to toothpicks.  Super easy and quick!  The 3 at the top is actually cut on vinyl with my cameo just to personalize it a little bit more :-)  This cupcake stand is now in my son's room and he puts his cars on it!

 I have seen these "gumball machines" many times so decided to make one for the party.  I got all of the supplies at Michaels.  It's a terracotta pot, the lid is the piece the pot usually sits on and then the handle on top was in their would section.  The glass is one of the little "fish bowls" also from Michaels.  I painted everything and then used vinyl and the Waltograph font on my silhouette studio to put my son's name and the 3.  I filled it with skittles for the party, but I am actually going to use it as a coin bank and put it in his room.  The checkered paper was made by my husband using Microsoft excel.  Isn't he awesome ;-)

Rice Krispy treats with chocolate frosting and skittles for the lights

 Stick pretzels dipped in melted chocolate.. Yum!

Sarge is from the digital kit.  Here is a link to the signs I used.  Click here!


I bought some Cars temporary tattoos from Party City and all of the kids loved them (even a couple parents!)
You can also use your silhouette with their tattoo paper and make your own but I ran out of time!


 Super easy and a fun addition to the party ;-)


The tables were made with black tablecloths and white paper cut for the stripes.  The characters were made with my cricut expression for his Car's party last year.  I am using votive candle holders to weight them down.


Had to throw one in of me and my sweet birthday boy ;-)


 Iced tea!

 Found these labels on the internet and then made them bigger in microsoft word and cut them out.


 More cuts from the digital kit (I just added the signs to them)

 Made with the cricut and the pail is from Hobby Lobby


The traffic cones belong to my husband. He is a track/cross-country coach and let me use them ;-)

Gift table!

Party Favors.  I made homemade play-doh and rolled them into balls to look like traffic lights.  The little bags are from Michaels and I taped them onto black paper.  I also included the recipe to make their own play-doh!


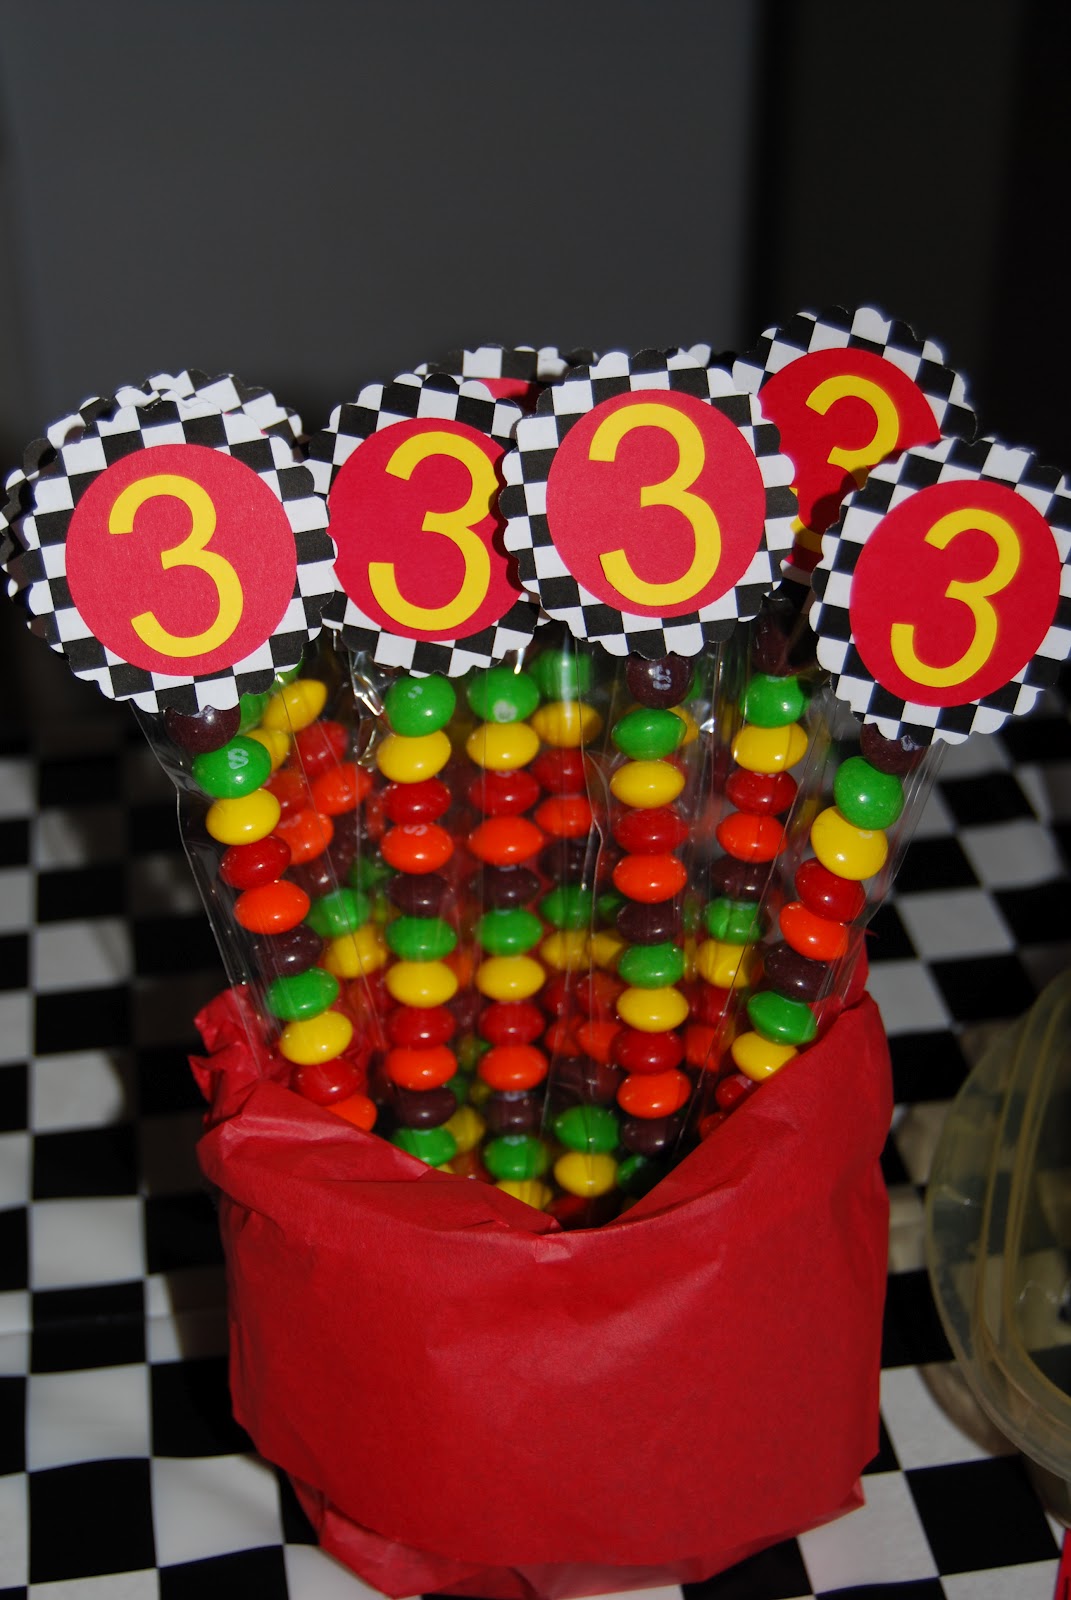
Each child also received their own skittle stick to take home.  I used my scalloped and round paper punches and then cut the three on my silhouette

Here is the recipe to make your own play-doh.  It is really soft and makes a good amount!
1 cup flour
1 cup water
1/4 cup salt
2 tsp cream of tartar
1 Tbsp vegetable oil
4 drops of food coloring
Combine all ingredients over medium heat and stir until it forms into a ball.  Remove from heat and cool on wax paper.  Once cool, knead a few times and store in air tight container!

And finally,  No party would be complete without a Disney Cars bounce house! 


Brady's new Disney Cars bike!

Ok, one more picture....  I hang balloons from my kid's doorways the night before their birthdays and they love waking up to it ;-)

I found a lot of my party ideas from this website and want to give credit to her!  Click here to check her party out!

Have a great day!

~Rebekah

Saturday, March 24, 2012

Getting' Crafty with the Cameo Blog Hop!

Good Morning Everyone!


I am so excited to be part of this amazing blog hop this morning!  If you are coming from Jennifer's blog, you are in the right place!  If you are just stopping by for a visit and want to see all the other fun projects, click here to go to the beginning.   Aren't you amazed by the projects you have seen so far??  My silhouette was a Christmas gift and I have been using it for everything.  It was hard to pick just one project to share with you!

My little guy is turning 3 today and we had a Disney Cars birthday party for him!  I was able to use my silhouette for a lot of the party decorations (which I will post on Monday), but I wanted to share one of the  projects that was my favorite from his party!

I made this fun, personalized t-shirt using my silhouette studio and Ink Jet transfer paper.  The silhouette studio is amazing because I can use any font I have on  my computer and print or cut it without a problem.  For this t-shirt, I decided how big I wanted the design to be and then used a bunch of different fonts to make the words look different.  Then, I flipped the words horizontally or vertically with the touch of a button.  I bought a Disney Cars digital kit and easily imported them into my studio to add them to the design!

My cute little model there loved his shirt and was showing everyone who came to his party :-)  The best part, this shirt only cost me about $4 total!!  You will definitely have to come back and visit tomorrow to see what other party projects were made with the silhouette ;-)

Remember, we have some amazing prizes on this hop.  To be entered to win, you must be a follower and leave a comment on each and every blog! Also, make sure you visit the sponsor's fan pages and thank them for the awesome blog hop prizes :-)  Don't miss out!!  Here are a list of the sponsors:
https://www.facebook.com/pages/CutAtHome/115976425605
https://www.facebook.com/silhouetteamerica
https://www.facebook.com/morepaperthanshoes
https://www.facebook.com/pages/Oh-My-Crafts/31250764811
https://www.facebook.com/pages/Scrapbook-Express/82215232201
https://www.facebook.com/pages/Taras-The-Twinery-Bakers-Twine/285603391464106
https://www.facebook.com/pages/Scraptastical-Kreations/120204111343309
https://www.facebook.com/expressionsvinyl
https://www.facebook.com/JadedBlossom
https://www.facebook.com/pinkbydesign?ref=ts
https://www.facebook.com/pages/Chomas-Creations/110438845662239

Isn't this the best blog hop ever!?!?!

If you get lost along the way, here are a list of everyone on the hop


Thanks for stopping by to visit me today! For my blog candy, I will chose one person using Random.org and send them a sheet of the transfer paper I used to create this t-shirt!

Now, head on over to the talented Gabrielle and see what she has in store for you!

~Rebekah

Wednesday, March 21, 2012

It's a Party!

Hi Everyone!
Yesterday was my day to post over at Pink by Design, and I wanted to share my project with you today!  My youngest is turning 3 this weekend and he is having a Disney Cars party (2 years in a row!)  He LOVES cars.  Luckily I kept the decorations I made from last year but wanted to do something new for his invitation.  I decided on a tri-shutter card because they have so much space to play with but fold down to fit a standard envelope.


I am going to do my best to start doing either picture or video tutorials because I know it makes it easier to try out some of these projects for yourself.  I have had quite a few requests so I am looking into the best way to do that :-)  If you want a great tutorial on how to make a tri-shutter card, click here!

I used my silhouette for the flags and disney cars, a 1 1/2 circle punch for the "traffic lights", and Pink by Design "Party time" stamp set for the sentiments.

My son loves his invitations and keeps one in his room on his dresser ;-)

~ Rebekah

Monday, March 19, 2012

Mickey Mouse Glass Etching

Hi Everyone,
Last week was my brother and sister in-laws anniversary and I wanted to do a little something for them.  My sister in-law is a huge Disney fan so I thought it would be fun to etch their initials on champagne glasses.  I used my Silhouette studio software to import the mickey ears, and put their initials inside using the Waltograph font.  I cut it out on vinyl, adhered it to the glass and added my etching cream.  Ten minutes later, it was ready!  I added bows just for a fun touch and put them in a gift bag with a bottle of Sparkling cider!  They Loved them :-)


Make sure you visit http://pinkbydesignstamps.com  tomorrow and check out my Pink by Design Post!!

Friday, March 16, 2012

M-I-C-K-E-Y Mouse!

Happy Friday!
Have I mentioned how much I absolutely LOVE my Silhouette Cameo?!?!?  I can't believe everything I can do with it.  Today I have a fun personalized shirt idea to share with you.  I waited until the t-shirts at Hobby Lobby went on sale and picked up a couple for my boys.  I also used a coupon while I was there to purchase Printable heat transfer paper.

I used my silhouette studio to import the Mickey Mouse ears and I filled it with black.  I then used my Waltograph font (Mickey Font) to write each of the boys names and filled it with white.  I then printed it on my printer with the registration marks, cut it out with my silhouette (just the outline of the mickey ears) and used my iron to transfer it to the shirt!


Didn't they turn out awesome!?  I used the transfer paper for another shirt that I am going to post next week.  This entire process cost me around $8 for both shirts total! You can't find that good of a deal at any Disney Store ;-)

Have a wonderful weekend!

~Rebekah

Thursday, March 15, 2012

Captain America!

Hi my friends!

My friends little boy is having a birthday on Saturday and he loves Captain America!  I was trying to figure out what I wanted to do for his card and then realized I could easily replicate his shield using my Silhouette Studio.  I drew 4 circles, each a little smaller than the last.  Then I added a star in the inner circle and resized it until it fit perfectly.  I welded two of the largest circles together to turn it into a card and then cut everything out separately.   I used a bone folder to fold the card and then used my ATG gun to adhere all of the circles and star to the card!


I really like how it turned out!  I had a blue gift bag in my stash and finished off the gift with red, white and blue tissue paper!  I love how my silhouette actually saves me money.  The Captain America gift bag at the store was $4.99.  I had everything here to make this one for free :-)

fun, huh?!

~Rebekah

Wednesday, March 14, 2012

More St. Paddy's Day inspiration

Hey Everyone,
I am really trying to post everyday but can't seem to get everyone in my house healthy at the same time!  I have been in my craft room making lots of things but just haven't had a chance to take pictures of them to get up here on my blog.  I just wanted to share with you a couple more things I have altered to fit in with St. Paddy's Day!

The first is this candle holder I received for Valentine's day!  I added some fun ribbon, a shamrock from the silhouette store, a button and Pink by Design twine to give it a new look for this month! So many possibilities from month to month :-)


For another project I took an empty blueberry container  and turned it into a little treat box for a friend.  There aren't any treats in it yet because I haven't been able to get to the store, but I am heading out soon!  I trimmed some patterned paper down to fit on top and added another shamrock from the silhouette store.  I am loving buttons and twine right now so I added those and then hand wrote the sentiment!


I love re-purposing things around the house to make fun gifts and decor!  Before you throw something out, think twice!  :-)

~Rebekah


Monday, March 12, 2012

St. Paddy's Day Wreath

Happy Monday Everyone!

Spring is already in full swing here in Arizona.  We are going to be in the 80's for most of the week and I have been getting my house ready for the warmer weather!  Last month I bought a wreath from Hobby Lobby and decorated it for Valentine's Day.  This month I decided to re-decorate it for St. Paddy's Day.


The shamrocks are from the silhouette store and I spruced them up with some buttons, pink by design twine and the "good luck" sentiment also from Pink by Design.  What I love about this is that it was really inexpensive!  I had all of these supplies on hand ;-)

Have a wonderful day,
~Rebekah