Pages

Create ~ Inspire ~ Share

Showing posts with label Valentine's day. Show all posts

Wednesday, February 13, 2013

Valentine's Day Gift Idea!

Hi Everyone!
I am really excited to show you a gift I have been working on for the past few days!  I wanted to make something special for my husband this year, and as soon as I found this frame (on clearance at Hobby Lobby!) I knew what I wanted to do!

Here is the before:


This is a metal frame that was marked down to $5 and I knew that vinyl would stick really well to it.  I wanted to remind my husband everyday how much I love him, so I thought I could add some chalkboard vinyl with the exact amount of days!  The font I used is Playball and I found the hearts in the silhouette store. I used Pink by design Twine and some heart embellishments to finish it off.  I love how I can keep changing the days as I go!

Here it is after:


Isn't this a fun idea!!  I am going to keep it next to his side of the bed so he sees it everyday.  Click HERE to see the website I used to find out how many days it had been since I fell for my sweet guy :-)

Thanks for stopping by today! Come back tomorrow and check out the fun Valentine's Day blog hop I am in for Pink by Design!!

~Rebekah

Friday, February 8, 2013

More Rainbow inspiration!

Hi Everyone!
You have one more day to link up to our PBD Rainbow Challenge!!  Click HERE to link up!!  Here is my "not a card" project using the "Love Always" Stamp Set!!


I can't wait to see what creations you come up with :-)

~Rebekah

Friday, January 18, 2013

More Brown, Pink and White Inspiration!

Hi Everyone,
Our challenge is still going on over at Pink by Design!  Create anything you want using Brown, Pink and White!! The winner will receive a $10 gift certificate to Pink by Design Store!!!  Here is my project for today using one of the new files in the Silhouette Store and Pink by Design sets "Everyday Banners" and "Trendy Alpha"!


This is actually a really large bowl and can hold lots of goodies!! ;-)

Come on over and link up your project here!

~Rebekah

Tuesday, February 14, 2012

Happy Valentine's Day!

Happy Valentine's Day Everyone!

Our countdown is over! Valentine's day is here and I am still not done making little treats for the special people in my life.  I am hoping to bust out a few more things while my boys nap :-)

Here are a few things I have been working on the last couple of days.  This first card I did completely by hand.  I saw this idea in Scrapbooks etc... magazine.  I thought it was cute and it was pretty easy to do.

This is just a standard size A2 card that I hand cut a circle out of.  I used some thread I had in a traveling sewing kit and attached it with my ATG gun.  I used a punch for the hearts.

Here is the inside of the card with the most important part, the CANDY!!


I put together a little gift full of goodies for my sweet husband.  I am so proud of him.  He works hard and is an amazing daddy and friend...  I decided to make a little tag to go on his Orange Crush that says "I've got a crush on you!"  I found the "Crush" on the internet and shrunk it down, printed it off and cut it out.  It didn't take very long and adds a fun touch!

And last but not least, this is the little gift I did for my dad.  He is on a diet and didn't want any candy but I had to get him something because he is the best grandpa ever to my two little boys.  He said that he loves almonds and so I decided to decorate the can for him :-)  The nuts are a cut from the silhouette store and I hand wrote on the tag.  I didn't use my machine much on these because (to be quite honest) my craft room looks like a tornado went through it and I couldn't get to it that easily, LOL!


The winner of the blog hop this weekend is........

 Nelda said...

I love the strawberruies - did you emboss them as well?

Congratulations Nelda!! I will be sending you an email shortly.  Thank you to everyone else who left sweet comments. I appreciate each and every one of you!
Have a wonderful Valentine's Day!
~Rebekah

Saturday, February 11, 2012

"Love my Cameo" Blog Hop


Hi Everyone!
I am so excited today to be part of this fun blog hop! When Sarah over at Pink Cricut asked if I would join her and Amy Chomas in a Silhouette Cameo inspired blog hop, I was thrilled!!  I love my Cameo!!  If you asked me to pick my favorite feature, I couldn't.  I love everything about it!

If you have come from Kelly over at  http://findingtimetocreate.blogspot.com/, then you are in the right place.  You definitely want to start at the beginning of the hop so you don't miss a thing!!

It was so hard for me to pick just one project because the silhouette has so much it can do! That being said, I combined two of it's features :-)   I decided to put a couple of 3D projects together from the Silhouette Store and then use the "Print and Cut" feature to finish it off.

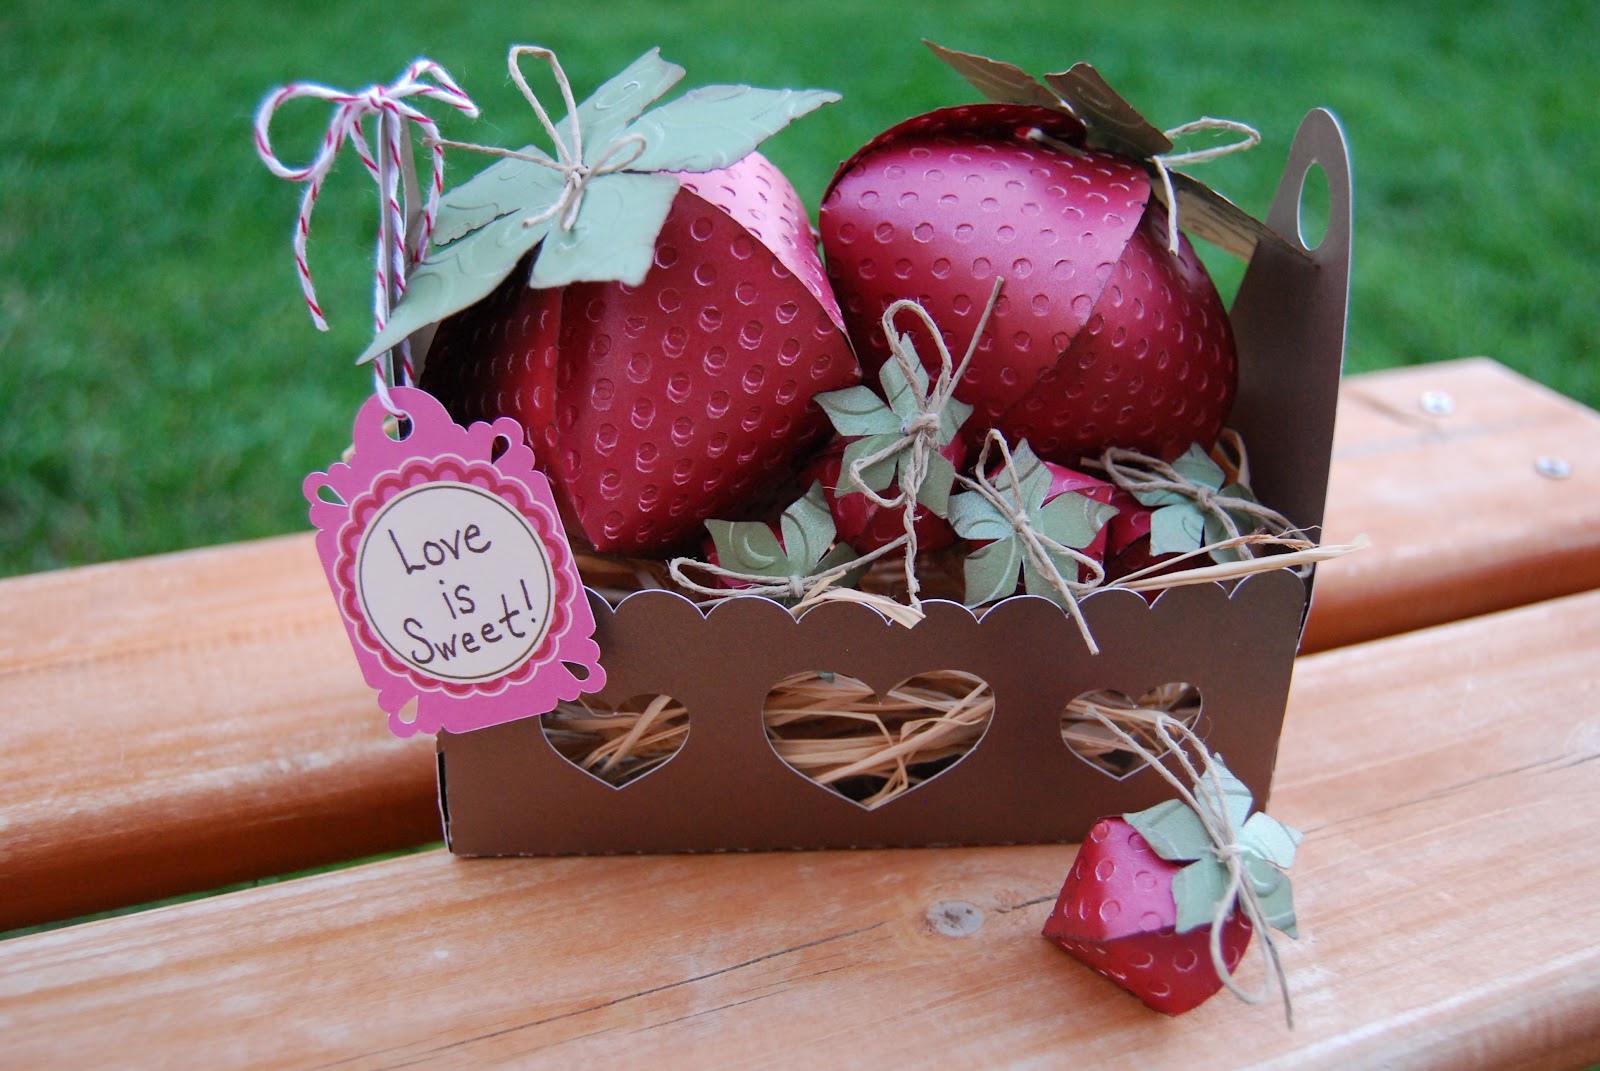
The 3D designs in the store are so easy to assemble and look beautiful when they are done.  I started with the 3D Toolbox, but I left the handle off so I had more room inside.  I decided I wanted to fill it with these beautiful 3D strawberries, which I filled with candy!  I used my Silhouette studio to change the sizes up to what I wanted and then ran them through my Cuttlebug to give them the look of real strawberries.  I used my cuttlebug on the leaves also and inked the edges just to add a little bit more detail to them.  The strawberries come together with twine or ribbon and took no time to put together.  The smaller ones are a perfect fit for Hershey Kisses ;-)
The tag is a "Print and Cut" feature of the silhouette.  I made it the size I wanted in the studio and printed it on my printer.  The Silhouette reads the registration marks and cuts it out perfectly!  I hand wrote the sentiment to go with my strawberries and LOVE how it turned out!


Here is a detailed view of the leaves...


...and here is the tag! The silhouette cut it out perfectly!!


It wouldn't be a blog hop without some type of blog candy now would it?!  If you become a follower and leave a comment on what your favorite thing about the cameo is so far, I will send one lucky follower all the cuts I used to make this kit (embossed and inked also) so you can make this project and see how easy it is to put together (even if you don't own the cameo...yet)! Plus, a picture never does it justice and it does look even more delicious in person!  Make sure you leave a way for me to get a hold of you :-)

I am now going to send you on your way to the super talented Gaby!

If you get lost along the way, here is a list of everyone in the blog hop!

Thank you for visiting me today!

~Rebekah

Friday, February 10, 2012

Valentine's Day Countdown (day10)

Happy Friday Everyone!
My boys are feeling a little bit better today and I was able to get into my craft room for a few minutes.  Yesterday, I saw a deal on one of the coupon sites for 5 clothespin chalkboard holders for $5.  I thought to myself, that would be so easy to do!

Supplies I used
~ clothespins
~ Valentine's day paper
~ Modge Podge
~Chipboard
~Chalkboard vinyl
~Glue Gun
~ATG Gun
~Magnet

I cut the paper to fit the top of the clothespin and modge podged it on.  When it was almost dry, I used a nail file to file down any excess paper along the edges.  I used my rotary cutter to cut chipboard into a rectange and adhered matching paper to it with my atg gun.  I then used my rotary cutter to cut chalkboard vinyl a little smaller than the rectangle and stuck it right on.  I attached the chipboard to the clothespin with a glue gun and then used the glue gun to adhere the magnet to the back!

Super Easy and I love how they turned out!  I am going to make one for each of my boys to display their "artwork" and maybe a few others to organize things around the house :-)


I am going to pin a picture of my boys on this one ;-)


It was such a quick project! They were up on my refrigerator within 15 minutes!!

Don't forget the "Love my Cameo" blog hop tomorrow morning!!  There will be lots of beautiful projects and some fun prizes!!

~Rebekah

Wednesday, February 8, 2012

Valentine's Day Countdown (day8)

Hi Everyone!

Today I have a cute little gable box cut from the silhouette store.  The Tweety bird is a print and cut also from the silhouette store.  I couldn't believe how fast this came together!  I hand wrote the tag and added the fun little heart brad!

Perfect to hold candy or small gift!


Sorry this is so short and late today.  I am watching 7 kids ages four and under today to help friends out!! My husband was sweet enough to stay home and help me and we were still running crazy! Half of them are sick and it has just been a non-stop insane day!! :-)

Hope you all are having a wonderful hump day!

~Rebekah

Thursday, February 2, 2012

Valentine's Day Countdown (day 2)

Hi Everyone,


It's day 2 of our countdown to Valentine's Day and I have an adorable project for you!  One of my favorite designers of silhouette cuts is Lori Whitlock!  She designs adorable projects that are so easy to cut and put together.
Today, I decided to put together the cute chapstick holder she designed.  I just grabbed some paper that I have had in my stash forever and it came together really quick!  The heart tag on the front is a print and cut design and I used my scalloped paper punch to for a little background color.


Here is the side view so you can see the chapstick tucked away


...and the front view!


There are so many possibilities for these little holders.  They would make fun party favors for parties or showers! They take less than a half sheet of paper to make so very inexpensive as well.  I have a friend who is addicted to chap stick, so I just might have to gift this one to her for Valentine's Day ;-)


Have a great day!


~Rebekah

Wednesday, February 1, 2012

Valentine's Day Countdown!

Hi Everyone!

Can you believe that we are in February already? Where does the time go?!  I thought it would be fun to have a Valentine's Day Countdown! Everyday leading up to Valentine's Day, I will post a "LOVE" themed project.

To start it off, I have a picture frame that I found at Michaels for $1!  I painted it with white acrylic paint (took 3 coats) and waited for it to dry thoroughly.  I then used my silhouette to cut out the intricate heart design on red vinyl.  I had a little bit of trouble getting it to stick, but once it was on there it stayed.  I then added a few rhinestones to the inside of the heart for a little sparkle!

I wanted to keep this frame simple so I just added some black ribbon and used a heart shaped brad to attach it.  The sentiment is from Pink by Design.


I really like how it turned out and that it really only cost about $1!  Might use this idea and make a frame for every holiday ;-)


Have a great day!


~Rebekah

Sunday, January 29, 2012

Super Simple Valentine Wreath

Hi Everyone,

I have been using my machines a lot lately and decided to give them the day off for this project! I found the wreath for about $3 with coupon at hobby lobby and knew I could spruce it up just a little :-)

I picked out my ribbon first and then found some paper in my stash that went with it. I cut the paper into 12 inch strips and scored at every half inch. I then folded on the lines like an accordion. I taped it together to form a circle and then made it lay flat to look like a flower. I then punched a 1 inch circle and hot glued it to the back so it would stay together.

The "LOVE" sentiment and the twine is from Pink by Design. I hot glued it on with a button that I had laying around and then glued them how I wanted onto the wreath. I am really happy with how it turned out!


Have a beautiful day!

~Rebekah

Pin It