Pages

Create ~ Inspire ~ Share

Showing posts with label vinyl. Show all posts

Tuesday, July 23, 2013

My Brother is a Superhero!

Hi Everyone! Today I have a fun project to share with you that I created for my boys rooms. They are really close in age and are inseparable. Recently, they have been all about superheroes and I had some cute pictures of them from a Mother's Day photo shoot.

 I bought the wood from Lowes, painted it with leftover paint from my younger son's room and then made a vinyl stencil for the wording. I made two so each of my kiddos have one :-)


I love how these turned out and they cost me less than $2 a piece to make! Can't beat that :-)

Thank you for stopping by to take a look!

~Rebekah

Monday, June 3, 2013

Angry Birds Space Birthday Party!

Hi Everyone!
Back in March, my little guy turned 4 and I just realized I never posted the Angry Birds Space Party we had for him :-)  There are a lot of pictures!  I made everything that you see here and adapted it to what we needed.  He LOVED it and still talks about how fun his party was!

Invitations


The cake!  My husband and I put our heads together and were really happy with how it turned out :-)


I used marshmallow fondant to create all of the characters and designed the sign and his name on my Silhouette.


I found this bucket at the dollar store and then added vinyl to it to personalize it!


The party favors were door hangers with angry bird crackers inside.


The balloons were also from the dollar store and I added vinyl to personalize them.  They are my go to when I need balloons.  They last for weeks!


I personalized the birthday boys t-shirt using my silhouette and printable iron on transfer paper.


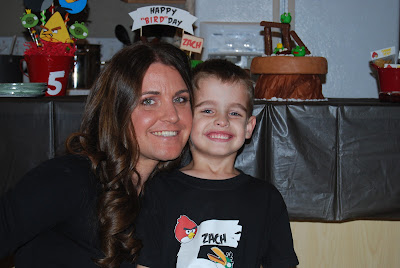
Me and my sweet little four year old :-)

Thanks for stopping by and looking!

~Rebekah

Wednesday, February 13, 2013

Valentine's Day Gift Idea!

Hi Everyone!
I am really excited to show you a gift I have been working on for the past few days!  I wanted to make something special for my husband this year, and as soon as I found this frame (on clearance at Hobby Lobby!) I knew what I wanted to do!

Here is the before:


This is a metal frame that was marked down to $5 and I knew that vinyl would stick really well to it.  I wanted to remind my husband everyday how much I love him, so I thought I could add some chalkboard vinyl with the exact amount of days!  The font I used is Playball and I found the hearts in the silhouette store. I used Pink by design Twine and some heart embellishments to finish it off.  I love how I can keep changing the days as I go!

Here it is after:


Isn't this a fun idea!!  I am going to keep it next to his side of the bed so he sees it everyday.  Click HERE to see the website I used to find out how many days it had been since I fell for my sweet guy :-)

Thanks for stopping by today! Come back tomorrow and check out the fun Valentine's Day blog hop I am in for Pink by Design!!

~Rebekah

Thursday, December 6, 2012

Angry Birds Birthday Party!

Hi Everyone,
Life has been extremely crazy since my last post and I am finally finding time to start posting again.  My oldest just turned 5 a couple weeks ago and he wanted an Angry Birds Party.  I had a lot of fun creating everything and my son loved t!!

The invitation!


I used my cameo's print and cut feature for the back of this invitation.  The font is called "Feast of Flesh"


I found this fun game on pinterest and knew I definitely wanted to do the same thing.  I used chunky soup cans and martha stewart acrylic paint for this project.  I free handed the pigs faces (wasn't too difficult).  I found the ball at Walmart for $1.50 and just painted on the birds face with acrylic paint.


It was a real hit at the party ;-)

My husband and I worked together on the cake.  He made the fondant and I created everything you see on top of the cake (except the twix!)  We used marshmallow fondant and wilton food gel.  It was actually not too difficult to make!


I used my silhouette cameo to make the sign and the TNT box.  The rocks are from Duff at Michaels.


The twix were perfect to build with and looked like wood :-)

 Here is an up close look at the pigs!

For party favors I decided to do ornaments.  My son's birthday is about a month from Christmas and I wanted to do something that everyone would want to keep.  I found these plastic ornaments at Hobby Lobby and got a great deal with my coupon.  I glittered the inside red and then used vinyl to put the faces on the outside.  On the back side I wrote "Thanks for Crashing Zach's Party" and then I added the date :-)


I love doing centerpieces for my kids' parties.  I whipped these up on my cameo and cut the "5" out of vinyl to personalize it a bit more.


I also try to have the food fit the theme.  I made little signs and had them sitting next to the different food on the table.  We had Dorito flavored pig ears (chips).  Cheesy Pig tails (spiral mac and cheese)  Shredded pork, and pigs in a blanket.  I didn't get a close up of those but they are on the front of the table in the next picture.  The bucket to the left was from the dollar store and I just added a face with vinyl.


I got most of his balloons at the dollar store (much better deal than party city) and the angry birds balloon from Walmart.  I used vinyl to personalize the balloons.


Another thing I sent the kids home with were Angry Birds Graham crackers that I found at Walmart. I put them into little baggies and made toppers for them that said "Thank you".


The party was so much fun!  I rented a bounce house and the kids never got bored :-)

Here is a picture of the birthday boy!  I made his shirt too :-)


Every year I get a picture with just him and I at his party!


Thanks for stopping by today!!

~Rebekah


Tuesday, September 25, 2012

Getting Ready for Fall

Hi Everyone,
I have been wanting to put a wreath up on my front door FOREVER, but I just couldn't figure out what I wanted.  I wanted something that could stay up year round but could easily be changed for the different times of year/holidays.  This wreath has been in my closet for almost a year so I decided today was the day.  Hobby Lobby has their wood letters on sale for 30% off (cost me less than three dollars) and their ribbon for 50% off.  I thought it would be cute to keep the letter the plain wood color and just change the bow throughout the year.  My silhouette came in handy for cutting the "Est. 2002" on brown vinyl and the font is playball.  There are super strong magnets holding the ribbon on the backside of the door which works perfectly!


Here is an up close view


I love how this turned out and how simple it will be to change it up.

~Rebekah

Monday, June 25, 2012

Vinyl on Tile!

Happy Monday Everyone!
I spent a good portion of my weekend painting and re-decorating my living room.  When it was finished, my family room needed something to spruce it up too.  I decided to get a tile that matched my kitchen floor and put vinyl on it as a nice little edition to the room. The tile is 12x12.  I used the Times New Roman and Playball for the fonts and created the whole thing on my silhouette software.  Vinyl doesn't like to stick to tile for some reason so I put a layer of modge podge first and let it dry.  The vinyl still didn't want to come off the transfer paper very easily but once on, it stuck really well!


I really like how it turned out, and it looks so nice in my family room :-)

~Rebekah

Thursday, May 24, 2012

Using Vinyl to personalize

Hi Everyone,
Today I wanted to share with you a couple vinyl projects that I have recently done.  I found the water bottles at the dollar store and I have had the bag in a closet for a few years.  The font on the bag is Curlz and I used Heat Transfer Vinyl.  The font on the water bottles is Waltograph.  I didn't use the special outdoor vinyl because I plan on hand washing the bottles and it is stuck on there pretty good.  I wouldn't put it in the dishwasher though.


The bag is a little dirty but that is because we have been using it a lot ;-)  My boys love that their water bottles have their names on them!

Have a great day!
~Rebekah

Tuesday, May 8, 2012

Glass etching vinyl

Hi Everyone!
We were invited to a birthday party this weekend for a 1 year old.  I always have a hard time buying a gift because I know they are going to get so many toys and usually there are duplicates.  I decided to make a gift that would be cute in the little guy's room.  I found this floating frame at Michaels 50% off and used my glass etching vinyl that I got from craftvinyl.com to personalize it.


I didn't have any pictures of the little guy so I used his invitation.  I am also giving his mom pre-cut vinyl with other numbers so she can change it out for years to come.  That is the best part of this etching vinyl (It can be changed!)

The fonts I used were Qumpelka#12 for the top and Playball for the bottom.

Sarah over at http://www.pinkcricut.com did a cute floating frame with their individual names and I wanted to try it out also.  I found this floating frame on clearance at Michaels for $7.99 and used my etching vinyl with it.  Same fonts as above.  I put an 8x10 photo inside ;-)


Have a great day!

~Rebekah

Tuesday, April 3, 2012

Awana Grand Prix

Good Morning!
First off, it is my day to post over at Pink by Design so head on over and check out the fun Easter basket I made ;-)

Both of my little guys are in Awana at our church and last week was the Grand Prix.  Each child gets a wooden car to put together and decorate and then they race each other on a pretty cool downhill track.  My husband is in charge of putting the tires and weights on, and it is my job to decorate them! (My kids are still a little young to do their own)

My youngest loves Lightning McQueen so I tried to make his car resemble him the best I could.  I used vinyl for the lightning and then used my cars digital kit for the 95 and Rusteze symbols which I put on with modge podge. The rest of the details were painted on with acrylic paint from Michaels.


I decided to do something a little different for my other son's car and make it a beach theme.  I painted the car blue, sponged on brown around the bottom to look like sand and then used vinyl for the surfboards, palm trees and crab.  I then painted on the eyes and the bumper/fender.  All of the vinyl cuts were found in the silhouette store and I scaled them down to fit the car.  I love how small it can cut and still give that detail!


fun, huh!?

My boys were excited to race their cars and ended up getting 2nd and 3rd place for design ;-)


Just another fun way to use the silhouette for something other than paper projects!!

Have a great day!

~Rebekah