Pages

Create ~ Inspire ~ Share

Showing posts with label t-shirt. Show all posts

Thursday, December 6, 2012

Angry Birds Birthday Party!

Hi Everyone,
Life has been extremely crazy since my last post and I am finally finding time to start posting again.  My oldest just turned 5 a couple weeks ago and he wanted an Angry Birds Party.  I had a lot of fun creating everything and my son loved t!!

The invitation!


I used my cameo's print and cut feature for the back of this invitation.  The font is called "Feast of Flesh"


I found this fun game on pinterest and knew I definitely wanted to do the same thing.  I used chunky soup cans and martha stewart acrylic paint for this project.  I free handed the pigs faces (wasn't too difficult).  I found the ball at Walmart for $1.50 and just painted on the birds face with acrylic paint.


It was a real hit at the party ;-)

My husband and I worked together on the cake.  He made the fondant and I created everything you see on top of the cake (except the twix!)  We used marshmallow fondant and wilton food gel.  It was actually not too difficult to make!


I used my silhouette cameo to make the sign and the TNT box.  The rocks are from Duff at Michaels.


The twix were perfect to build with and looked like wood :-)

 Here is an up close look at the pigs!

For party favors I decided to do ornaments.  My son's birthday is about a month from Christmas and I wanted to do something that everyone would want to keep.  I found these plastic ornaments at Hobby Lobby and got a great deal with my coupon.  I glittered the inside red and then used vinyl to put the faces on the outside.  On the back side I wrote "Thanks for Crashing Zach's Party" and then I added the date :-)


I love doing centerpieces for my kids' parties.  I whipped these up on my cameo and cut the "5" out of vinyl to personalize it a bit more.


I also try to have the food fit the theme.  I made little signs and had them sitting next to the different food on the table.  We had Dorito flavored pig ears (chips).  Cheesy Pig tails (spiral mac and cheese)  Shredded pork, and pigs in a blanket.  I didn't get a close up of those but they are on the front of the table in the next picture.  The bucket to the left was from the dollar store and I just added a face with vinyl.


I got most of his balloons at the dollar store (much better deal than party city) and the angry birds balloon from Walmart.  I used vinyl to personalize the balloons.


Another thing I sent the kids home with were Angry Birds Graham crackers that I found at Walmart. I put them into little baggies and made toppers for them that said "Thank you".


The party was so much fun!  I rented a bounce house and the kids never got bored :-)

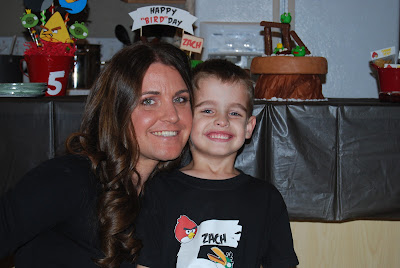
Here is a picture of the birthday boy!  I made his shirt too :-)


Every year I get a picture with just him and I at his party!


Thanks for stopping by today!!

~Rebekah


Monday, June 25, 2012

Angry Birds Personalized T-Shirts

Hi!
Today I have a project for you that I am super excited about.  Recently, my 3 and 4 year olds have become obsessed with Angry Birds on my husband's iPad.  I am not exactly thrilled that they are wanting to play video games this young so I limit them to 10 minutes each for the whole day.  Well, we were at the water park today and my 3 year old spotted an Angry Birds beach towel and was so excited.  He knows I can make stuff so he said "make me one please???"  Melted my heart and I told him I could make him a t-shirt.

I found Angry Birds jpegs on my computer and put them into my Silhouette Software.  I had to trace and detach them before I made them the size I wanted.  I found a font that looks exactly like angry birds font called "Feast of Flesh" (that sounds really nice, doesn't it!?)  You can get it for free at dafont.com. I adjusted everything the way I wanted it and left my son's name white so it would show up really nice on a black shirt.

I used the print and cut feature of my silhouette for this project.  I made sure it was set for standard size paper, added the registration marks, made sure my cut lines were correct, and then I printed it onto "June Tailor Dark T-Shirt Transfer paper" that I found at Michaels.  I then cut it on my silhouette.  I used the light print paper settings which keeps your blade at one and clicked for it to double cut.

I followed the iron on directions and voila!!!!!


I finished it just before bedtime and my little guy's face just lit up!  He said "Thank you Mommy!" and ran to show his daddy and brother.  He asked if he could wear it and I told him "as soon as he wakes up" ;-) He wanted me to take his picture holding it up!


Of course I had to make my 4 year old one too!  He hasn't seen it yet because it wasn't quite ready when he went to bed!


I do have the silhouette files and would be happy to email them to you if you would like!  Leave me a comment with your email address and I will get it out to you!

Have a great day!

~Rebekah
P.S. I found the shirts at Michaels, and they are 4 for $10 right now!